Basic Defense Techniques in Mahjong
Hi, tenpaiman here (aka TMN or TemporaryMobileName or whatever else I happen to prefer to be called on any given day). Today I decided to do a translation of a mahjong article by totsugeki touhoku [とつげき東北], author of the famous Kagaku Suru Ma-jan series of books on digital playing and statistics-based theory of mahjong, discussing defense, betaori, and all that important stuff. As a preliminary to this article, you should read up on suji and kabe, which is discussed frequently in this article and forms the basis of most defense techniques in mahjong. You can do so here.
The translation omits some of the repetitions (and yes, he likes repeating the same points over and over. Not my fault!) and less important stuff. The original Japanese version of this article can be found here.
Betaori against riichi one riichi: Theory (Important)
Basic safety level of tiles: (Extremely Important)
The following is the order of safety level of tiles. Barring special circumstances, this is the order in which you should discard. Prioritize this order over any kind of discard reading; you’ll deal in less. Tiles within the same rank have more or less the same safety level, but ones above are slightly safer than ones below on the within the same rank.
| **Safety Level** | **Tile type** | **Description** | **Note** |
| **SS** | *Genbutsu *[現物、furiten tile] | 100% Safe | These tiles are mostly safe, and if you’re about 2 shanten and your hand isn’t looking bad, you might consider discarding these. For any given tile, the more of them you can see, the safer it is. |
| **S** | Yakuhai with 2 or more already discarded | Safe except in cases of odd waits. Usually cheap even if you deal in. | |
| *Otakaze* [オタ風、non-yakuhai wind tile] with 1 or more already discarded | Safe except in cases of odd waits. Usually cheap even if you deal in. | ||
| Suji terminals | Safe except in cases of odd waits. Usually cheap even if you deal in. If you can see three of them, the possibility of shanpon wait is also gone. | ||
| **A** | Otakaze tile | Safe except in cases of odd waits. Usually cheap even if you deal in. | |
| Double suji 456 tiles | Fairly safe. Usually people don’t riichi with this kind of crappy wait, but occasionally you might deal into ittsuu or something. | ||
| **B** | Yakuhai with one discarded | Big if you do deal in, but much better than no-suji terminals | These are usually safe, but not something to discard during betaori. You’d consider discarding them if you can get into tenpai by doing so or you’re in 1 shanten with a good shape. |
| Suji 28 tiles | Safe to ryanmen and penchan waits. If the wait is kanchan, at least there’s no tanyao or pinfu. | ||
| Suji 37 tiles | Also adds the possibility of penchan wait, but basically not much different from 28 tiles. Discard the one that has many of the tiles around it already discarded. | ||
| **C** | Live yakuhai | Discard if you have a big hand that’s around 1 shanten. | |
| Suji 2378 tile of riichi declare tile or the discard right before it | |||
| **D** | Terminals | Dangerous against ryanmen, which is the most common wait shape, but at least there’s no kanchan or penchan, and you’re safe against tanyao. | You might discard these if you have a great hand in 1 shanten or so, but consider these dangerous. |
| Single suji 456 | Should be safer than no-suji. | ||
| Dora yakuhai | Low probability of dealing in, but big if you do deal in. If you’re last place in oorasu, you might as well consider these safe tiles. | ||
| **E** | 28 tiles | Unlike 19 tiles, you might deal into tanyao or kanchan wait. | These are high danger tiles |
| 37 tiles | Also adds penchant wait possibility. | ||
| **F** | No-suji 456 tiles | Dangerous against all wait shapes. These are about twice as dangerous as 123/789 tiles. |
- Above are for typical situations. Always consider specifics of the current situation, like the points. If you’re in a situation where your place is secure as long as you don’t deal into a mangan, discard suji 2 instead of hellwait dora.
- An outer tile of a tile discarded before riichi (e.g. 9 when riichi discard tile is 7) goes up one rank in safety (except in cases of early riichi)
- Only consider one-chance tiles (3 tiles kabe) when comparing between tiles of the same rank. Consider them one rank safer in cases of early riichi.
- Tiles around the tile discarded right before riichi or as riichi declare tile, or tiles around dora, go down one rank in safety.
- Dora should be thought of as about two ranks down in safety, except in cases where making the wait around it is difficult in the first place.
- Ignore ankou-suji.
- Ignore ura-suji.
- Within the same rank, prioritize discards that are more difficult to have as wait shape. For example, suji 7 with three 8 tiles discarded is fairly safe. Also, suji tiles are safer the more of them you can see on the table.
- This should be obvious, but a 3 tile in case where 2 and 4 are discarded is no safer than any other tile, and is in fact more dangerous. There’s no need to consider any other factor than those mentioned here.
Everything above is the basic theory of discard safe against one riichi. You can also apply many of these (like safe tiles that are safe because it’s hard or impossible to have wait shape for them) in defending against open hands. There is about 50% difference in dealing-in probability between each rank in the table. In other words, little differences in safety level made by things like ankou-suji or discard order pale in comparison to the chart. Never consider a lower-ranked tile safer than a higher-ranked tile (except depending on point situation where discarding low-probably, high-payout tile like dora tanki might be preferable to higher-probably, lower-payout waits). Don’t think of it as uncool to deal in with live dora honour tile; if you don’t have a higher ranked tile on the chart, discard the dora honour tile.
For the chart to become second nature, just memorize it. With this alone, you’ll play better. Don’t be like one of those low-R people that deal into riichi pinfu dora 1 by discarding some non-suji instead of riichi-discard suji tile. In particular, get a feel for the difference between rank D and rank E on the chart. Even among all the crap-wait riichi, waits like kanchan 5 and shanpon 4/6 are rare. Assuming ryanmen, single suji 456 and no-suji 23 are both just as safe one another, but in cases of shit wait, there’s definitely a difference.
What to do when you don’t have a safe tile: (Important)
If you don’t have a safe tile (i.e. when you only have tiles below rank D or so), discard pairs and triplets to buy you extra safe tile if the first one passes. Also, if you don’t have a pair or triplet, discard a tile which automatically creates another safe tile (e.g. discard 5, which makes your next 2 relatively safe. Of course don’t discard that 5 if there’s a higher ranked tile).
Betaori against one riichi: Application: (Important)
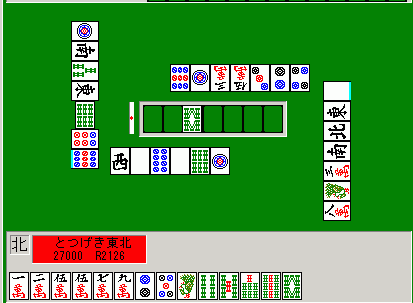
Example: Betaori against one riichi

When your hand shape is this bad, you shouldn’t be thinking about anything other than betaori in the safest way. That is, think of other players that might do okkake riichi, and preserve tiles that are also safe against other players (that’s why 6s is discarded before 1p here). This is very important.
So here, I drew a 8s and there’s no more genbutsu left. What to discard?
If you remember the chart, there’s no need to waver. I discarded 9s without any hesitation.
Example:
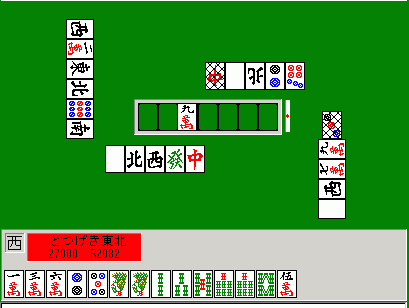
(3p was pon’d by south player)
Did you memorize the chart?
Select your discard.
If you mastered my betaori technique, there’s no need to hesitate when choosing what to discard here. There’s no genbutsu, so don’t try to read the discards or anything and just follow the chart. Going by the chart, you should discard a single-suji middle tile over no-suji tiles edge tiles (23/78). Terminals are in the same rank as single-suji middle tiles. 2p is one-chance, but it’s around the riichi discard tile, so it goes down one rank and becomes less safe than terminals. So the discard candidates are 6m or 1s. But do you remember what to do when there aren’t enough safe tiles? Discard a pair or a triplet to buy another safe discard. So the only discard here is 1s. There is no need to read. Against one riichi, simply follow the chart.
Example:
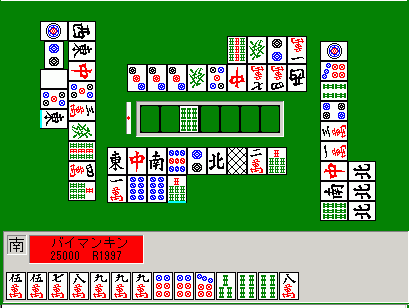
Following the chart, 7m is the first discard. 7p looks somewhat safe because it’s one-chance and outer tile of 5p that was discarded early, but following the rank, 7m comes first. After 7m is 9p, then 7p, then 3s.
Betaori against two riichi: Theory (Important)
There are quite a few people who panic, hesitate, and end up discarding no-suji terminals or something like that. Choose your discard more carefully. Keep the following in mind: assume ryanmen (or dora) wait; definitely avoid dealing into an ippatsu; dealer is 50% more dangerous than nondealer; tile near dora is twice as dangerous. You should be looking for the following, in this order: (single suji against a riichi is about as safe as an edge tiles against that player).
◎ Genbutsu against both riichi
○ Suji against both riichi (all honour tiles go here)
● Edge genbutsu tile against ippatsu
● Edge genbutsu tile against dealer
● Edge suji tile against dealer
△ Any genbutsu tile against one riichi
△ Double suji tile against one riichi
▲ Edge tile
× Middle tile
Follow this order, except in cases where (because of point situation) you definitely can’t afford to deal into one of the riichi. Discard a tile that’s 100% safe against one of the riichi over another tile that looks kind-of-safe against both riichi. One-chance doesn’t mean anything against two riichi. One-chance is considered safe because there’s a chance that the last one is in another player’s hand, but in cases of two riichi, that last tile could very well be in the hand of one of the players in riichi. Don’t try to read. If you deal in, then you deal in.
Betaori against two riichi: Application (Important)
Example:
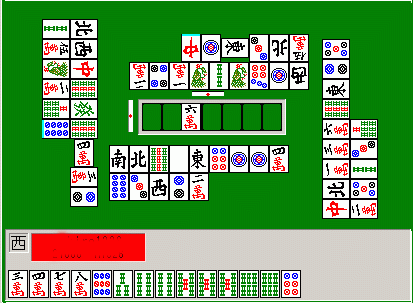
Try to focus and find a tile that’s safe against both riichi, in the following order:
Genbutsu -> Double suji -> Normal suji -> Tiles you can see all four of.
If there isn’t any, find the tiles that are safe against the riichi you don’t want to deal into, and then among those, discard the tile that’s the safest against the other riichi. In this case, 4s is definitely the safest. 8m wouldn’t be a discard made by the best players. Only the worst players would pick 9p.
Example:
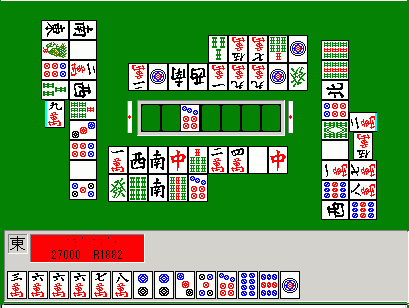
Instead of panicking, look at the discards and your hand. First, you should avoid ippatsu, so look at kamicha’s discards. You should see that all manzu tiles are dangerous. Looking for safe tiles from pinzu and souzu, 3p, 5p, and 9p are about the only safe discards. Then look at shimocha’s discards. 3p and 9p look safe. Again, look for the tile that’s safe against the riichi you don’t want to deal into, then, among the candidates, look for the tile that’s safe against the other riichi. In this case, 9p wait could only be hellwait tanki, so that’s what you should discard. Player in this screenshot discarded 2p. Don’t do this.

